How to Grow and Care for an Amaryllis Plant
Hippeastrum
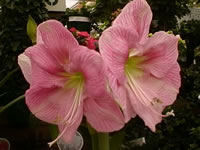
Nothing can break the gloom, like a beautifully blooming House Plant in the dead of winter. Of all of the flowering bulbs, the Amaryllis is the easiest to force into bloom. The large size (up to six inch blooms) of the showy flowers, as well as the ease with which they can be grown in the home make the Amaryllis extremely popular as a gift plant during the holiday seasons
Amaryllis plants come in many beautiful colors including shades of red, white, pink, salmon and orange. There are also many bi-colored varieties, combining shades of pink or red with white. Amaryllis is a tender bulb which originated in the Andes mountains of South America.
Therefore, unfortunately, it can only be grown outdoors, year round in USDA zones 9-11. In other zones, the potted plants may be moved outdoors after the danger of frost has passed but must be brought back indoors in September.

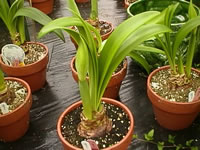
Growing pre-planted Amaryllis
- Amaryllis can be purchased as individually packaged or bulk bulbs, but more often are sold in a pre-potted condition. The pre-planted Amaryllis gift boxes normally take no more initial effort than simply watering them with room temperature water to bring them into growth.
- Avoid getting water on the nose of the bulb.
- Keep the potting medium moist, but not wet. Don't over-water!
- The plant should be kept in a brightly lighted area at about 70-75 degrees F.
- After the plant begins to grow, feeding is essential.
- Either use a complete slow-release fertilizer which lasts several months, or a water soluble fertilizer twice a month.
- Once the plant is flowering, keep it out of direct sunlight, and slightly cooler to promote a longer flower life.
- After all flowers fade, cut them off at the top of the stalk. When the stalk begins to sag, carefully cut it off just above the bulb nose. Continue to water and fertilize as normal, until the leaves begin to yellow.
- At this time, cut the leaves back to about 2 inches from the top of the bulb and remove it from the pot.
- Keep the bulb in a cool (40-50 degree f), dark place for a minimum of 6-8 weeks.
Planting and Forcing Amaryllis Bulbs into Bloom
- Any time after that, you may repot the bulb, and begin the process over again, but plant bulbs 8 weeks before you would like them to bloom.
- Bulbs may be planted at two week intervals, from September through February to ensure non-stop winter bloom, until May.
- Plant in a well-drained, sterile potting medium, using a standard 6-inch diameter pot.Be sure that the pot has adequate drainage holes.
- Plant the bulb, with about one-third being above the rim of the pot.
- Press the soil down firmly to set the bulb securely in place.
- Water thoroughly, and your plant will begin anew.

Propagating Amaryllis Plants
Bulbs that are older than two years will produce offset bulblets. These bulblets may be left attached to the mother and repotted that way, creating quite a show. Preferably, the bulblets are carefully removed from the mother bulb (immediately before it is replanted), and planted in their own individual pots. These little bulbs will take two years of growth before they will produce their first flower.
Amaryllis - Hippeastrum